Pages

Tuesday, August 31, 2010

Realistic Spotlight Effect in Photoshop Photoshop Tutorial

1


Take this picture of a Porsche as an example, it is a little bit underexposed and could be touched up with just a little bit of levels or curves. Instead of just brightening the image which would be our natural instant, let’s create a bit more interest and instead create a spotlight effect.


2

Begin by creating a selection with the elliptical marquee tool.

3


Choose Select>Transform Selection
A bounding box will appear
You can now rotate, scale and resize the selection
Rotate the selection so that the oval falls on the car at an angle as shown

4

Press enter/return to apply the transformation to the selection
We are now going to create a curves adjustment layer.
Choose a new adjustment layer from the bottom of the layers palette and select curves
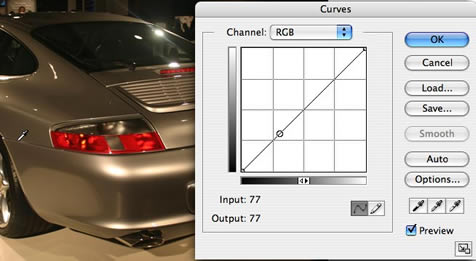
You should now see the curves dialog box
Move the mouse outside the box and into the image, you will notice that it is now an eyedropper tool
Click and drag and you will see a  little circle appear on the diagonal line of the curve. This is the tonal range of the area that you are moving the mouse over. Take a note of where the range is on the curve.


5
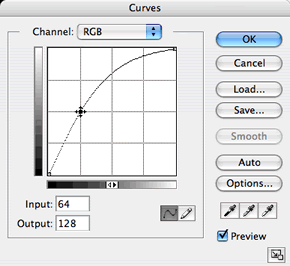

Click and drag on the curve. Move the point up and notice that the image will be lightened.


6


If you look at the layers palette, you will see the adjustment layer with a layer mask applied. Notice that the area of the mask where the selection was present is now white.
Click on the mask to make it active (It should already be active by default)

7

We will now soften the lights edge
Choose   Filter>blur>Gaussian blur

8


The spotlight effect should be looking pretty good by now.
The final thing is to remove the effect from the areas that would be in shadow and not illuminated in real life. (such as the air)
 Choose black for the foreground color and select  the brush tool
Click and drag the paintbrush and you will paint away the adjustment from the regions you desire because you are painting on a mask

9


And finally we have our result, a soft spotlight on our car. Compare this to the starting image to see the difference.

You can lower the opacity of the adjustment layer if you desire to tone down the effect a little. You can use this technique on all kinds of photos including people. This is a great way to draw attention to certain areas of images and put things under the err… spotlight.

Hand Colouring A Black And White Photo In Photoshop - Photoshop Tutorial

You can hand colour a black and white photograph in Photoshop in a number of ways. In this tutorial, I’m looking at how to add colour by making selections and using adjustment layers. Let me preface this by saying, THIS EFFECT DOES NOT LOOK NATURAL! It will not look like a colour photograph, but is great for a retro look and can be good fun on old pictures. However, nobody will mistake it for an original colour picture.

Step 1
Open up a black and white photo. I’m using this image from “Vertigo” by Alfred Hitchcock. I got it from movieweb.com which is a good source of high resolution movie stills.

Hand Colouring A Black And White Photo In Photoshop - Photoshop 
Tutorial

Step 2
Choose Image > Mode > RGB to change the photo from greyscale to RGB colour mode. Now we’re going to select different parts of the image and paste them onto new individual layers. The quick mask is helpful here.

Step 3
Select the Quick Mask (Q) and choose a suitable brush size. Start painting on any area of skin in the pic. Painting with black will cover an area in pink-red, this is the part that will be selected.


Hand Colouring A Black And White Photo In Photoshop - Photoshop 
Tutorial

Step 4
Make sure to leave the eyes out of the selection. If you’ve included them, just change the brush foreground colour to white and paint them out of the selection. You can do this anywhere you’ve made a mistake and “gone outside the lines”.

Hand Colouring A Black And White Photo In Photoshop - Photoshop 
Tutorial

Step 5
When you’re happy that you have only the skin area selected (no clothes, no eyes, no background!), press Q again to switch from Quick Mask mode back to Normal mode. You will see that the areas you painted in black are now selected. We need to invert this selection now so choose Shift + Ctrl + I (win) or Shift + Cmd + I (mac) to do so.

Step 6
Copy the selection by pressing Ctrl + C (win) or Cmd + C (mac).

Step 7
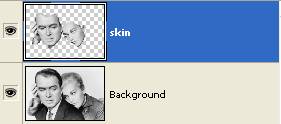
Paste the selection back in by pressing Ctrl + V (win) or Cmd + V (mac). This will paste the Skin selection into a new layer. Rename the layer in the layers palette (by double-clicking on it’s current name – Layer 1) and call it something like, ehm, Skin.

Hand Colouring A Black And White Photo In Photoshop - Photoshop 
Tutorial

Step 8
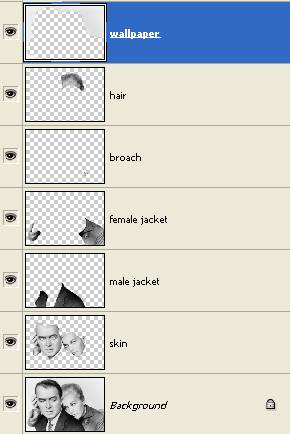
Now repeat steps 3 to 7, so that you have layers for hair, jackets (I did male and female as separate layers), wallpaper and whatever other sections you want to colour in. Your layers palette should end up looking something like this;

Hand Colouring A Black And White Photo In Photoshop - Photoshop 
Tutorial

Step 9
Now that each part has been isolated, we can start colouring!

Step 10
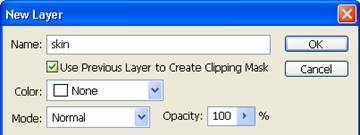
Click on the skin layer to select it. Choose Layer > New Adjustment > Layer > Color Balance. I’ve named the new adjustment layer “skin” and also hit the checkbox “Use previous layer to create clipping mask” so that a checkmark appears in the box. Click ok.

Hand Colouring A Black And White Photo In Photoshop - Photoshop 
Tutorial

Step 11
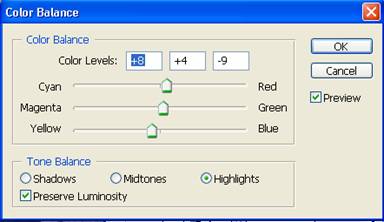
Now the Color Balance dialog box opens and here you can decide what kind of colours you want to set up. If you’re going for an alien look, you might want to give your subject green or blue skin. For my image I used the following settings:
Shadows: +81 -8 -31
Midtones: +12 -7 -17
Highlights: +8 +4 -9

Hand Colouring A Black And White Photo In Photoshop - Photoshop 
Tutorial

Click OK and you will have set up an adjustment layer that doesn’t alter the pixels in your original image. To go back and change any settings, double click on the thumbnail with the shapes in it.

Hand Colouring A Black And White Photo In Photoshop - Photoshop 
Tutorial

Looks freakishly cool already!

Step 12
Repeat steps 10 and 11 for every part of the image that you have isolated, setting up adjustment layers and colours as you go. My final image looked like this:

Hand Colouring A Black And White Photo In Photoshop - Photoshop 
Tutorial

It’s worth spending a bit of time getting your initial selections right, then it’s easy to pick and choose colours with the adjustment layers.

Sunday, August 29, 2010

SETTING GPRS SEMUA OPERATOR

Setting GPRS INDOSAT

Profile Name : INDOSATGPRS
Homepage URL : http://wap.klub-mentari.com
IP Address : 10.19.19.19
Bearer : GPRS
User Name : indosat
Password : indosat
APN : indosatgprs


Profile Name : INDOSATMMS
Connection URL : http://mmsc.indosat.com
IP Address : 10.19.19.19:8080
Bearer : GPRS
User Name : indosat
Password : indosat
APN : indosatmms
Tarif : Rp. 1.375/50 Kbyte


Bagi anda pelanggan Telkomsel Anda dapat segera memanfaatkan layanan GPRS, perhatikan hal-hal berikut ini:

Khusus pelanggan kartuHALO

1. Menggunakan ponsel dengan fasilitas GPRS.

2. Mendaftar sebagai pelangan GPRS, pendaftaran dapat dilakukan di GraPARI atau hubungi Caroline di nomor 111, layanan bebas pulsa dari kartuHALO Anda, atau melalui SMS.

Caranya :
- Ketik pesan SMS : GPRS
- Contoh : GPRS
- Kirim ke : 6616

Catatan :
- Tarif pesan kirim SMS : Rp. 250 ,- / pesan.

3. Sistem akan memberikan pesan notifikasi SMS kepada Anda setelah beberapa waktu untuk memberitahukan bahwa
permintaan aktivasi sedang diproses : "Your request for GPRS Setup already received. Please wait for max. 48 hours for succesfull activation notification message."

4. Setelah proses aktivasi sukses dilakukan, sistem akan memberitahukan kepada Anda melalui SMS dari 6616 : "Welcome to GPRS Service! Your GPRS service has been activated. Please visit www.telkomsel.com for more information"

5. Pemrosesan aktivasi membutuhkan waktu maksimum 48 jam.

6. Melakukan setting pada terminal komunikasi yang digunakan

7. Berada di wilayah layanan GPRS

8. Untuk menggunakan WAP Telkomsel dengan GPRS, pastikan Anda telah terdaftar pada www.telkomsel.com, jika Anda belum terdaftar segera register disini.

9. Untuk menggunakan WAP Telkomsel dengan GPRS, pastikan Anda melakukan setting handset untuk menggunakan Access Point Name (APN) telkomsel .


Khusus pelanggan simPATI Nusantara

1. Menggunakan ponsel dengan fasilitas GPRS.

2. Masih memiliki pulsa minimum Rp. 500,- dibawah nilai tersebut Anda tidak dapat menggunakan layanan GPRS, MMS maupun SMS.

3. Mendaftar sebagai pelanggan GPRS, yang hanya dapat dilakukan melalui SMS.

Caranya :
- Ketik pesan SMS : GPRS
- Contoh : GPRS 6210009922069556
- Kirim ke : 6616

Catatan :
- Tarif pesan kirim SMS : Rp. 350 ,- / pesan.
- Nomor kartu merupakan nomor ICCID (Integrated Circuit Card Identification) yang terdiri dari 16 (enam belas) digit nomor dan terdapat di belakang chip kartu simPATI Nusantara Anda.
- Isi pesan tidak tergantung pada huruf besar atau kecil (non case sensitive).
- Dalam pengetikan nomor kartu tidak boleh ada spasi.

4. Sistem akan memberikan pesan notifikasi SMS kepada Anda setelah beberapa waktu untuk memberitahukan bahwa permintaan aktivasi sedang diproses : "Your request for GPRS Setup already received. Please wait for max. 48 hours for succesfull activation notification message."

5. Pemrosesan aktivasi membutuhkan waktu maksimum 48 jam.

6. Setelah proses aktivasi sukses dilakukan, sistem akan memberitahukan kepada Anda melalui SMS dari 6616 : "Welcome to GPRS Service! Your GPRS service has been activated. Please visit www.telkomsel.com for more information"

7. Melakukan setting pada terminal komunikasi yang digunakan.

8. Berada di wilayah layanan GPRS

9. Untuk menggunakan WAP Telkomsel dengan GPRS, pastikan Anda telah terdaftar pada www.telkomsel.com, jika Anda belum terdaftar segera register disini.

10. Untuk menggunakan WAP Telkomsel dengan GPRS, pastikan Anda melakukan setting handset untuk menggunakan Access Point Name (APN) telkomsel


Handphone 3230

Konfigurasi Automatic via OTA (Over The Air Activation)

S Nokia 3230, TelkomselGPRS, 1234

Format Dasar OTA untuk handphone TCP/ IP based (ex. 6600, 6230, 7610, dll) :

S

kemudian kirim ke 5432

keterangan:
S = Subscribe
Merk = contoh: Nokia, Siemens
Type = contoh: 3650, 6600
Setting = contoh: TelkomselGPRS(untuk semua setting), Tsel-wap, Tsel-mms, Tsel-csd
PIN = optional, beberapa handphone yg termasuk "tcp/ip mobilephone" membutuhkan kode pin 1234


Konfigurasi Manual WAP over GPRS

Nokia 3230

• Tekan Tombol Menu untuk mendapatkan menu utama
• Pilih Tools
• Pilih Setting
• Pilih Connection
• Pilih Access Point
• Pilih Option
• Pilih New Access Point
• Input Parameter sebagai berikut
• Connection Name : GPRS WAP
• Data Bearer : GPRS
• Access Point Name : telkomsel
• User Name : wap
• Prompt Password : No
• Password : wap123
• Authentication : Normal
• Homepage : http://wap.telkomsel.com
• Tekan Option, pilih Advanced settings
- Phone IP address : Automatic
- Primary name server : 0.0.0.0
- Second. name server : 0.0.0.0
- Proxy serv. address : 10.1.89.130
- Proxy port number : 8000


Konfigurasi Manual MMS over GPRS

Parameter Umum

• Connection Name : APN MMS
• Data Bearer : GPRS
• Access Point Name : mms
• Username : wap
• Prompt Password : No
• Password : wap123
• Authentication : Normal
• Gateway IP address : 10.1.89.150
• Homepage : http://mms.telkomsel.com
• Connection Security : Off
• Session Mode : Permanent


Nokia 3230

• Tekan tombol menu untuk mendapatkan menu utama
• Pilih Tools
• Pilih Setting
• Pilih COnnection
• Pilih Option
• Pilih New Access Point
• Isi Parameter sebagai berikut
• Connection Name : GPRS MMS
• Data Bearer : GPRS
• Access Point Name : mms
• User Name : wap
• Password : wap123
• Prompt Password : No
• Authentication : Normal
• IP Address : 10.1.89.150
• Homepage : http://mms.telkomsel.com/
• Connection Security : Off
• Session Mode : Permanent

• Kembali ke menu utama
• Pilih Messaging
• Tekan Options
• Pilih Settings
• Pilih Multimedia message
• Isi Parameter sebagai berikut
• Preffered connection : GPRS MMS
• Seconday connection : None
• Multimedia reception : Always on
• On receiving msg. : Retr. immediately
• Allow anon. messages : Yes
• Receive adverts : Yes
• Receive reports : Yes
• Deny report sending : No
• Message validity : Maximum time
• Image size : Small (atau Large)
• Default speaker : Loudspeaker


Nokia N70

WAP Settings
Go to Menu -> Tools - Settings -> Connection -> Access points
Cllick on Options -> New access point -> Use default settings

Then edit the details:
Connection name : TSEL-DATA
Data bearer : Packet data
Access point name : telkomsel
User name : wap
Prompt password : No
Password : wap123
Authentication : Normal
Homepage : http://wap.telkomsel.com

When you are done, click on Options -> Advanced Settings
Then edit the details:
Network type : IPv4
Phone IP Address : Automatic
DNS Address : Automatic
Proxy serv. Address : 10.1.89.130
Proxy port number : 8000

Go to Menu -> Services -> Options -> Settings
Access point and homepage used should be:
Access point : TSEL-DATA
Homepage : http://wap.telkomsel.com

Then you are ready to browse wap.telkomsel.com by choosing Menu -> Services or Menu --> Web

Streaming Settings
Prior to create following streaming setting then access point has to be created first

Go to Menu -> Applications -> Real Player
Click on Options -> Settings -> Connection ->Proxy
Use proxy : No

Go to Menu -> Applications -> Real Player
Click on Options -> Settings -> Connection ->Network
Default access point : TSEL-GPRS

Now you are ready to stream by choosing Menu -> Services and go to http://wap.telkomsel.com

MMS Settings
Go to Menu -> Tools - Settings -> Connection -> Access points
Cllick on Options -> New access point -> Use default settings

Then edit the details:
Connection name : TSEL-MMS
Data bearer : Packet data
Access point name : mms
User name : wap
Prompt password : No
Password : wap123
Authentication : Normal
Homepage : http://mms.telkomsel.com

When you are done, click on Options -> Advanced Settings
Then edit the details:
Network type : IPv4
Phone IP Address : Automatic
DNS Address : Automatic
Proxy serv. address : 10.1.89.150
Proxy port number : 8000

Go to Menu -> Messag. ->Options -> Settings -> Multimedia Message
Verify that following settings are used:
Access point in use : TSEL-MMS
Multimedia retrieval : Auto. in home network
When the settings are as described above, then you are ready to send and receive MMS


Nokia N-Gage

Konfigurasi Manual WAP over GPRS

Parameter Umum

• Connection Name : APN Telkomsel
• Data Bearer : GPRS
• Access Point Name : telkomsel
• Username : wap
• Prompt Password : No
• Password : wap123
• Authentication : Normal
• Gateway IP address : 10.1.89.130
• Homepage : http://wap.telkomsel.com
• Connection Security : Off
• Session Mode : Permanent


Nokia N-Gage

• Tekan Tombol Menu untuk mendapatkan menu utama
• Pilih Tools
• Pilih Setting
• Pilih Connection
• Pilih Option
• Pilih New Access Point
• Input Parameter sebagai berikut
• Connection Name : WAP over GPRS
• Data Bearer : GPRS
• Access Point Name : telkomsel
• User Name : wap
• Password : wap123
• Prompt Password : No
• Authentication : Normal
• IP Address : 10.1.89.130
• Homepage : http://wap.telkomsel.com
• Connection Security : off
• Session Mode : Permanent


Konfigurasi Manual MMS over GPRS

Parameter Umum

• Connection Name : APN MMS
• Data Bearer : GPRS
• Access Point Name : mms
• Username : wap
• Prompt Password : No
• Password : wap123
• Authentication : Normal
• Gateway IP address : 10.1.89.150
• Homepage : http://mms.telkomsel.com
• Connection Security : Off
• Session Mode : Permanent


Nokia N-Gage

• Tekan tombol menu untuk mendapatkan menu utama
• Pilih Tools
• Pilih Setting
• Pilih COnnection
• Pilih Option
• Pilih New Access Point
• Isi Parameter sebagai berikut
• Connection Name : GPRS MMS
• Data Bearer : GPRS
• Access Point Name : mms
• User Name : wap
• Password : wap123
• Prompt Password : No
• Authentication : Normal
• IP Address : 10.1.89.150
• Homepage : http://mms.telkomsel.com/
• Connection Security : Off
• Session Mode : Permanent

• Kembali ke menu utama
• Pilih Messaging
• Tekan Options
• Pilih Settings
• Pilih Multimedia message
• Isi Parameter sebagai berikut
• Preffered connection : GPRS MMS
• Seconday connection : None
• Multimedia reception : Always on
• On receiving msg. : Retr. immediately
• Allow anon. messages : Yes
• Receive adverts : Yes
• Receive reports : Yes
• Deny report sending : No
• Message validity : Maximum time
• Image size : Small (atau Large)
• Default speaker : Loudspeaker


Nokia N-Gage

Konfigurasi Manual WAP over GPRS

Parameter Umum

• Connection Name : APN Telkomsel
• Data Bearer : GPRS
• Access Point Name : telkomsel
• Username : wap
• Prompt Password : No
• Password : wap123
• Authentication : Normal
• Gateway IP address : 10.1.89.130
• Homepage : http://wap.telkomsel.com
• Connection Security : Off
• Session Mode : Permanent


Nokia N-Gage

• Tekan Tombol Menu untuk mendapatkan menu utama
• Pilih Tools
• Pilih Setting
• Pilih Connection
• Pilih Option
• Pilih New Access Point
• Input Parameter sebagai berikut
• Connection Name : WAP over GPRS
• Data Bearer : GPRS
• Access Point Name : telkomsel
• User Name : wap
• Password : wap123
• Prompt Password : No
• Authentication : Normal
• IP Address : 10.1.89.130
• Homepage : http://wap.telkomsel.com
• Connection Security : off
• Session Mode : Permanent


Konfigurasi Manual MMS over GPRS

Parameter Umum

• Connection Name : APN MMS
• Data Bearer : GPRS
• Access Point Name : mms
• Username : wap
• Prompt Password : No
• Password : wap123
• Authentication : Normal
• Gateway IP address : 10.1.89.150
• Homepage : http://mms.telkomsel.com
• Connection Security : Off
• Session Mode : Permanent


Nokia N-Gage

• Tekan tombol menu untuk mendapatkan menu utama
• Pilih Tools
• Pilih Setting
• Pilih COnnection
• Pilih Option
• Pilih New Access Point
• Isi Parameter sebagai berikut
• Connection Name : GPRS MMS
• Data Bearer : GPRS
• Access Point Name : mms
• User Name : wap
• Password : wap123
• Prompt Password : No
• Authentication : Normal
• IP Address : 10.1.89.150
• Homepage : http://mms.telkomsel.com/
• Connection Security : Off
• Session Mode : Permanent

• Kembali ke menu utama
• Pilih Messaging
• Tekan Options
• Pilih Settings
• Pilih Multimedia message
• Isi Parameter sebagai berikut
• Preffered connection : GPRS MMS
• Seconday connection : None
• Multimedia reception : Always on
• On receiving msg. : Retr. immediately
• Allow anon. messages : Yes
• Receive adverts : Yes
• Receive reports : Yes
• Deny report sending : No
• Message validity : Maximum time
• Image size : Small (atau Large)
• Default speaker : Loudspeaker


Nokia 9210

Konfigurasi Manual WAP over CSD

Parameter Umum

• Profile name : Telkomsel WAP (sesuai pilihan anda)
• Dial Up number : 8789
• Call Type : ISDN
• Login name : wap
• Password : wap123
• IP address : 10.1.89.130
• Port : 9201
• Homepage : http://wap.telkomsel.com


Nokia 9210

• Tekan tombol "Extras" di keyboard
• Pilih icon "Control Panel", lalu tekan "Open"
• Pilih icon "Internet access", lalu tekan "Select"
• Pilih "New" untuk create new connection, lalu pilih "New" sekali lagi pada saat konfirmasi.
• Pilih "Connection name", lalu isi "Telkomsel"
• Pilih "Phone number", lalu isi "8789"
• Biarkan "Password prompt" seperti apa adanya, yaitu "No"
• Pilih "Username", lalu isi "wap"
• Pilih "Password", lalu isi "wap123"
• Pilih "Confirm Password", lalu isi "wap123"
• Tekan "Advanced settings"
• Pilih "Proxies"
• Pilih "User proxy server", lalu tekan "Change", kemudian pilih "Yes", tekan "OK"
• Pilih "Port number", lalu isi "9201"
• Pilih "Proxy server", lalu isi "10.1.89.130"
• Biarkan "No proxy for" seperti apa adanya, yaitu blank/kosong
• Pilih "Data call"
• Biarkan "Connection type" seperti apa adanya, yaitu "Normal"
• Pilih "Remote modem type", lalu tekan "Change", kemudian pilih "V.110 ISDN", tekan "OK"
• Pilih "Max. connection speed", lalu tekan "Change", kemudian pilih "9600", tekan "OK"
• Biarkan "Modem initialisation" seperti apa adanya, yaitu blank/kosong
• Pilih "Callback"
• Biarkan "Use callback" seperti apa adanya, yaitu "No"
• Pilih "Other"
• Biarkan "Allow plain text login" seperti apa adanya, yaitu "Yes"
• Biarkan "Use PPP compression" seperti apa adanya, yaitu "Yes"
• Tekan "Done"
• Pilih "Preferred connection", lalu tekan "Change", kemudian pilih "Telkomsel", tekan "OK"
• Tekan "Done" sehingga kembali ke menu "Control Panel"
• Tekan tombol "Internet" di keyboard
• Pilih icon "WAP" lalu tekan "Open"
• Tekan tombol "Menu" di keyboard
• Pilih menu "Tools"
• Pilih "WAP access"
• Tekan tombol "New"
• Pilih "Name" lalu isi dengan "Telkomsel-wap"
• Biarkan "Secure conncetion" seperti apa adanya, yaitu "No"
• Pilih "Internet access", lalu tekan "Change", pilih "Telkomsel", tekan "OK"
• Pilih "Gateway IP address", lalu isi "10.1.89.130"
• Tekan "Done" sebanyak 2 (dua) kali sehingga kembali ke menu "Bookmarks"
• Tekan tombol "Menu" di keyboard
• Pilih menu "Bookmarks"
• Pilih "Add bookmark"
• Pilih "Name", lalu isi dengan "Telkomsel Homepage"
• Pilih "Address", lalu isi dengan http://wap.telkomsel.com
• Pilih "WAP access", lalu tekan "Change", pilih "Telkomsel-wap", tekan "OK"
• Tekan "Done"
• Dari menu "Bookmarks", pilih "Telkomsel Homepage", lalu tekan "Go To" untuk mulai browsing


Konfigurasi Otomatis WAP dan MMS over GPRS

• Ketik pesan SMS : SMerkTipe

• Contoh : S Nokia 3650

• Kirim ke : 5432

• Tarif pesan kirim SMS :
- Rp. 250,-(kartuHALO)
- Rp. 350,-(simPATI)

• Selanjutnya Anda akan menerima Configuration Message sesuai type dan fasilitas yang ada pada ponsel Anda, simpan Configuration Message yang Anda terima dan Anda dapat mulai menggunakan layanan GPRS.

• Beberapa ponsel memerlukan konfirmasi sebelum mengirimkan setting selanjutnya setelah setting pertama diterima, Jika Anda mendapatkan pesan SMS "You will receive the next setting, OK?". Balas/reply pesan ini dengan menuliskan "Y" dan kirim ke nomor tujuan 5432 untuk mendapatkan setting berikutnya. Ikuti petunjuk untuk melakukan "save setting"


Konfigurasi Manual WAP over GPRS

Parameter Umum

• Connection Name : APN Telkomsel
• Data Bearer : GPRS
• Access Point Name : telkomsel
• Username : wap
• Prompt Password : No
• Password : wap123
• Authentication : Normal
• Gateway IP address : 10.1.89.130
• Homepage : http://wap.telkomsel.com
• Connection Security : Off
• Session Mode : Permanent


Nokia 3650

• Tekan Tombol Menu untuk mendapatkan menu utama
• Pilih Tools
• Pilih Setting
• Pilih Connection
• Pilih Option
• Pilih New Access Point
• Input Parameter sebagai berikut
• Connection Name : WAP over GPRS
• Data Bearer : GPRS
• Access Point Name : telkomsel
• User Name : wap
• Password : wap123
• Prompt Password : No
• Authentication : Normal
• IP Address : 10.1.89.130
• Homepage : http://wap.telkomsel.com
• Connection Security : off
• Session Mode : Permanent


Konfigurasi Manual MMS over GPRS

Parameter Umum

• Connection Name : APN MMS
• Data Bearer : GPRS
• Access Point Name : mms
• Username : wap
• Prompt Password : No
• Password : wap123
• Authentication : Normal
• Gateway IP address : 10.1.89.150
• Homepage : http://mms.telkomsel.com
• Connection Security : Off
• Session Mode : Permanent


Nokia 3650

• Tekan tombol menu untuk mendapatkan menu utama
• Pilih Tools
• Pilih Setting
• Pilih COnnection
• Pilih Option
• Pilih New Access Point
• Isi Parameter sebagai berikut
• Connection Name : GPRS MMS
• Data Bearer : GPRS
• Access Point Name : mms
• User Name : wap
• Password : wap123
• Prompt Password : No
• Authentication : Normal
• IP Address : 10.1.89.150
• Homepage : http://mms.telkomsel.com/
• Connection Security : Off
• Session Mode : Permanent

• Kembali ke menu utama
• Pilih Messaging
• Tekan Options
• Pilih Settings
• Pilih Multimedia message
• Isi Parameter sebagai berikut
• Preffered connection : GPRS MMS
• Seconday connection : None
• Multimedia reception : Always on
• On receiving msg. : Retr. immediately
• Allow anon. messages : Yes
• Receive adverts : Yes
• Receive reports : Yes
• Deny report sending : No
• Message validity : Maximum time
• Image size : Small (atau Large)
• Default speaker : Loudspeaker


Nokia 3300

Konfigurasi Otomatis WAP dan MMS over GPRS

• Ketik pesan SMS : SMerkTipe

• Contoh : S Nokia 3300

• Kirim ke : 5432

• Tarif pesan kirim SMS :
- Rp. 250,- (kartuHALO)
- Rp. 350,- (simPATI)

• Selanjutnya Anda akan menerima Configuration Message sesuai type dan fasilitas yang ada pada ponsel Anda, simpan Configuration Message yang Anda terima dan Anda dapat mulai menggunakan layanan GPRS.

• Beberapa ponsel memerlukan konfirmasi sebelum mengirimkan setting selanjutnya setelah setting pertama diterima, Jika Anda mendapatkan pesan SMS "You will receive the next setting, OK?". Balas/reply pesan ini dengan menuliskan "Y" dan kirim ke nomor tujuan 5432 untuk mendapatkan setting berikutnya. Ikuti petunjuk untuk melakukan "save setting"


Nokia 6100

Konfigurasi Otomatis WAP dan MMS over GPRS

• Ketik pesan SMS : SMerkTipe

• Contoh : S Nokia 6100

• Kirim ke : 5432

• Tarif pesan kirim SMS :
- Rp. 250,- (kartuHALO)
- Rp. 350,- (simPATI)

• Selanjutnya Anda akan menerima Configuration Message sesuai type dan fasilitas yang ada pada ponsel Anda, simpan Configuration Message yang Anda terima dan Anda dapat mulai menggunakan layanan GPRS.

• Beberapa ponsel memerlukan konfirmasi sebelum mengirimkan setting selanjutnya setelah setting pertama diterima, Jika Anda mendapatkan pesan SMS "You will receive the next setting, OK?". Balas/reply pesan ini dengan menuliskan "Y" dan kirim ke nomor tujuan 5432 untuk mendapatkan setting berikutnya. Ikuti petunjuk untuk melakukan "save setting"


Nokia 6600


Konfigurasi Automatic via OTA (Over The Air Activation)

S Nokia 6600, TelkomselGPRS, 1234

Format Dasar OTA untuk handphone TCP/ IP based (ex. 6600, 6230, 7610, dll) :

S

kemudian kirim ke 5432

keterangan:
S = Subscribe
Merk = contoh: Nokia, Siemens
Type = contoh: 3650, 6600
Setting = contoh: TelkomselGPRS(untuk semua setting), Tsel-wap, Tsel-mms, Tsel-csd
PIN = optional, beberapa handphone yg termasuk "tcp/ip mobilephone" membutuhkan kode pin 1234


Konfigurasi Manual WAP over GPRS

• Connection Name : APN Telkomsel
• Data Bearer : GPRS
• Access Point Name : telkomsel
• Username : wap
• Prompt Password : No
• Password : wap123
• Authentication : Normal
• Proxy address : 10.1.89.130
• Port : 8000
• Homepage : http://wap.telkomsel.com
• Connection Security : Off
• Session Mode : Permanent


Nokia 6600

• Tekan Tombol Menu untuk mendapatkan menu utama
• Pilih Tools
• Pilih Setting
• Pilih Connection
• Pilih Access Point
• Pilih Option
• Pilih New Access Point
• Input Parameter sebagai berikut
• Connection Name : GPRS WAP
• Data Bearer : GPRS
• Access Point Name : telkomsel
• User Name : wap
• Prompt Password : No
• Password : wap123
• Authentication : Normal
• Homepage : http://wap.telkomsel.com
• Tekan Option, pilih Advanced settings
- Phone IP address : Automatic
- Primary name server : 0.0.0.0
- Second. name server : 0.0.0.0
- Proxy serv. address : 10.1.89.130
- Proxy port number : 8000


Nokia 7200

Konfigurasi Manual WAP over GPRS

• Connection Name : APN Telkomsel
• Data Bearer : GPRS
• Access Point Name : telkomsel
• Username : wap
• Prompt Password : No
• Password : wap123
• Authentication : Normal
• Proxy address : 10.1.89.130
• Port : 8000
• Homepage : http://wap.telkomsel.com
• Connection Security : Off
• Session Mode : Permanent


Nokia 7200

• Tekan tombol Menu
• Pilih icon Services
• Pilih menu Settings
• Pilih menu Connection settings
• Pilih menu Active service settings
• Pilih (empty) baris teratas, tekan Activate
• Pilih menu Edit active service settings
• Isi parameter sebagai berikut:
- Settings' name : GPRS WAP
- Homepage : http://wap.telkomsel.com
- Proxies : Enable
- Primary proxy address : 10.1.89.130:8000
- Data bearer : GPRS
• Bearer setting
- GPRS access point : telkomsel
- Authentication type : Normal
- Login type : Automatic
- Username : wap
- Password : wap123


Konfigurasi Manual MMS over GPRS

Parameter Umum

• Connection Name : APN MMS
• Data Bearer : GPRS
• Access Point Name : mms
• Username : wap
• Prompt Password : No
• Password : wap123
• Authentication : Normal
• Proxy address : 10.1.89.150
• Proxy port : 8000
• Homepage : http://mms.telkomsel.com/
• Connection Security : Off


Nokia 7200

• Tekan tombol Menu untuk mendapatkan menu utama
• Pilih Messages
• Pilih Message settings
• Pilih Multimedia msgs.
• Save send messages : No
• Delivery reports : Yes
• Scale image down : Yes
• Default slide timing : 00:08
• Allow multimedia reception : In home network
• Incoming multimedia messages : Retrieve
• Connection settings
+ Active multimedia settings, pilih salah satu (empty) yang ada, tekan Activate
+ Edit active multimedia settings
+ Settings' name : MMS GPRS
+ Homepage : http://mms.telkomsel.com/
+ Proxies : Enable
+ Primary proxy
+ Proxy address : 10.1.89.150
+ Port : 8000
+ Data bearer : GPRS
+ Bearer settings
- GPRS access point : mms
- Authentication type :
- User name : wap
- Password : wap123
+ Allow adverts : No


Nokia 7260

Konfigurasi Automatic via OTA (Over The Air Activation)

S Nokia 7260, TelkomselGPRS, 1234

Format Dasar OTA untuk handphone TCP/ IP based (ex. 6600, 6230, 7610, dll) :

S

kemudian kirim ke 5432

keterangan:
S = Subscribe
Merk = contoh: Nokia, Siemens
Type = contoh: 3650, 6600
Setting = contoh: TelkomselGPRS(untuk semua setting), Tsel-wap, Tsel-mms, Tsel-csd
PIN = optional, beberapa handphone yg termasuk "tcp/ip mobilephone" membutuhkan kode pin 1234


Konfigurasi Manual WAP over GPRS

• Connection Name : APN Telkomsel
• Data Bearer : GPRS
• Access Point Name : telkomsel
• Username : wap
• Prompt Password : No
• Password : wap123
• Authentication : Normal
• Proxy address : 10.1.89.130
• Port : 8000
• Homepage : http://wap.telkomsel.com
• Connection Security : Off
• Session Mode : Permanent


Nokia 7260

• Tekan tombol Menu
• Pilih icon Settings
• Pilih menu Configuration settings
• Pilih menu Personal Configuration Settings
• Pilih option (kiri bawah), pilih Add new
• Pilih Services
• Isi parameter sebagai berikut:
- Account name : TSEL WAP
- Homepage : http://wap.telkomsel.com
- Access point settings (pilih) :
+ Isi parameter berikut :
- Proxy : Enable
- Proxy Address : 10.1.89.130
- Proxy Port : 8000
- Data bearer : GPRS
- Bearer settings (pilih) :
+ Isi parameter berikut :
- GPRS accress point : telkomsel
- Authentication type : normal
- User name : wap
- Password : wap123
- Tekan Back
- Tekan Back
• Pilih option (kiri bawah), pilih Activate
• Tekan Back
• Pilih menu Default Configuration Settings
• Pilih menu Personal Config.
• Pilih options (kiri bawah), pilih set as default
• Pilih Activate default in applications, pilih yes
• Tekan Back (hingga menu utama)
• Pilih ikon services, pilih Home


Konfigurasi Manual MMS over GPRS

• Connection Name : APN MMS
• Data Bearer : GPRS
• Access Point Name : mms
• Username : wap
• Prompt Password : No
• Password : wap123
• Authentication : Normal
• Proxy address : 10.1.89.150
• Proxy port : 8000
• Homepage : http://mms.telkomsel.com/
• Connection Security : Off


Nokia 7260

• Tekan tombol Menu
• Pilih icon Settings
• Pilih menu Configuration settings
• Pilih menu Personal Configuration Settings
• Pilih option (kiri bawah), pilih Add new
• Pilih Multimedia msg.
• Isi parameter sebagai berikut:
- Account name : TSEL MMS
- Server address : http://mms.telkomsel.com
- Access point settings (pilih) :
+ Isi parameter berikut :
- Proxy : Enable
- Proxy Address : 10.1.89.150
- Proxy Port : 8000
- Data bearer : GPRS
- Bearer settings (pilih) :
+ Isi parameter berikut :
- GPRS accress point : mms
- Authentication type : normal
- User name : wap
- Password : wap123
- Tekan Back
- Tekan Back
• Pilih option (kiri bawah), pilih Activate
• Tekan Back (hingga ke menu utama)
• Pilih Messages
• Pilih Message settings
• Pilih Multimedia msg.
• Pilih Configuration settings
• Pilih option (kiri bawah), pilih Activate
• Isi configuration dengan memilih Personal config.
• Tekan back
• Isi account dengan TSEL MMS
• Tekan back (hingga ke menu utama)


Nokia 7610

Konfigurasi Automatic via OTA (Over The Air Activation)

S Nokia 7610, TelkomselGPRS, 1234

Format Dasar OTA untuk handphone TCP/ IP based (ex. 6600, 6230, 7610, dll) :

S

kemudian kirim ke 5432

keterangan:
S = Subscribe
Merk = contoh: Nokia, Siemens
Type = contoh: 3650, 6600
Setting = contoh: TelkomselGPRS(untuk semua setting), Tsel-wap, Tsel-mms, Tsel-csd
PIN = optional, beberapa handphone yg termasuk "tcp/ip mobilephone" membutuhkan kode pin 1234


Konfigurasi Manual WAP over GPRS

• Connection Name : APN Telkomsel
• Data Bearer : GPRS
• Access Point Name : telkomsel
• Username : wap
• Prompt Password : No
• Password : wap123
• Authentication : Normal
• Proxy address : 10.1.89.130
• Port : 8000
• Homepage : http://wap.telkomsel.com
• Connection Security : Off
• Session Mode : Permanent


Nokia 7610

• Tekan Tombol Menu untuk mendapatkan menu utama
• Pilih Tools
• Pilih Setting
• Pilih Connection
• Pilih Access Point
• Pilih Option
• Pilih New Access Point
• Input Parameter sebagai berikut
• Connection Name : GPRS WAP
• Data Bearer : GPRS
• Access Point Name : telkomsel
• User Name : wap
• Prompt Password : No
• Password : wap123
• Authentication : Normal
• Homepage : http://wap.telkomsel.com
• Tekan Option, pilih Advanced settings
- Phone IP address : Automatic
- Primary name server : 0.0.0.0
- Second. name server : 0.0.0.0
- Proxy serv. address : 10.1.89.130
- Proxy port number : 8000


Konfigurasi Manual MMS over GPRS

Parameter Umum

• Connection Name : APN MMS
• Data Bearer : GPRS
• Access Point Name : mms
• Username : wap
• Prompt Password : No
• Password : wap123
• Authentication : Normal
• Gateway IP address : 10.1.89.150
• Homepage : http://mms.telkomsel.com
• Connection Security : Off
• Session Mode : Permanent


Nokia7610

• Tekan tombol menu untuk mendapatkan menu utama
• Pilih Tools
• Pilih Setting
• Pilih COnnection
• Pilih Option
• Pilih New Access Point
• Isi Parameter sebagai berikut
• Connection Name : GPRS MMS
• Data Bearer : GPRS
• Access Point Name : mms
• User Name : wap
• Password : wap123
• Prompt Password : No
• Authentication : Normal
• IP Address : 10.1.89.150
• Homepage : http://mms.telkomsel.com/
• Connection Security : Off
• Session Mode : Permanent

• Kembali ke menu utama
• Pilih Messaging
• Tekan Options
• Pilih Settings
• Pilih Multimedia message
• Isi Parameter sebagai berikut
• Preffered connection : GPRS MMS
• Seconday connection : None
• Multimedia reception : Always on
• On receiving msg. : Retr. immediately
• Allow anon. messages : Yes
• Receive adverts : Yes
• Receive reports : Yes
• Deny report sending : No
• Message validity : Maximum time
• Image size : Small (atau Large)
• Default speaker : Loudspeaker


Nokia 7710

Konfigurasi Automatic via OTA (Over The Air Activation)

S Nokia 7710, TelkomselGPRS, 1234

Format Dasar OTA untuk handphone TCP/ IP based (ex. 6600, 6230, 7610, dll) :

S

kemudian kirim ke 5432

keterangan:
S = Subscribe
Merk = contoh: Nokia, Siemens
Type = contoh: 3650, 6600
Setting = contoh: TelkomselGPRS(untuk semua setting), Tsel-wap, Tsel-mms, Tsel-csd
PIN = optional, beberapa handphone yg termasuk "tcp/ip mobilephone" membutuhkan kode pin 1234


Konfigurasi Manual WAP over GPRS

Jika sudah terdapat setting TELKOMSEL

• Pilih icon Control Panel
• Pilih icon Internet Setup
• Pilih Preferred access point : TSEL GPRS
• Tekan Ok


Jika belum terdapat setting TELKOMSEL Nokia 7710

• Pilih icon Control Panel
• Pilih icon Internet Setup
• Pilih New Access pt.
• Tekan Next
• Isi Connection Name : TSEL WAP, Pilih Data bearer : GPRS, Tekan Next
• Isi Network Type : IPv4
• Auto-retrieve access point (kosongkan)
• Access point name : internet
• Tekan Next
• Prompt password at every login (kosongkan)
• Isi User Name : wap
• Isi Password : wap123
• Tekan Next
• Tekan Finish
• Pilih Preferred access point : TSEL WAP
• Centang Ask before connection
• Tekan Ok


Konfigurasi Manual MMS over GPRS

Jika sudah terdapat setting TELKOMSEL

• Pilih icon messaging
• Tekan PULLDOWN MENU BUTTON (tombol kiri tengah)
• Pilih Tools
• Pilih Message settings
• Pilih Multimedia message...
• Access point in use : TSEL MMS
• Tekan Ok


Jika belum terdapat setting TELKOMSEL Nokia 7710

• Pilih icon Control Panel
• Pilih icon Internet Setup
• Pilih New Access pt.
• Tekan Next
• Isi Connection Name : TSEL MMS, Pilih Data bearer : GPRS, Tekan Next
• Isi Network Type : IPv4
• Auto-retrieve access point (kosongkan)
• Access point name : internet
• Tekan Next
• Prompt password at every login (kosongkan)
• Isi User Name : wap
• Isi Password : wap123
• Tekan Next
• Tekan Advanced
• Pilih Proxies
• Protocol : HTTP
• Centang Use Proxy
• Proxy server address : 10.1.89.150
• Port number : 8000
• Tekan Ok
• Tekan Finish
• Tekan MAIN MENU BUTTON (tombol kiri bawah)
• Pilih icon messaging
• Tekan PULLDOWN MENU BUTTON (tombol kiri tengah)
• Pilih Tools
• Pilih Message settings
• Pilih Multimedia message...
• Access point in use : TSEL MMS
• Homepage : http://mms.telkomsel.com
• Centang Receive report
• Send message : immediately
• Message validity : Maximum time
• Tekan Ok


Konfigurasi Manual E-mail over GPRS

Nokia 7710

• Tekan MAIN MENU BUTTON (tombol kiri bawah)
• Pilih icon messaging
• Tekan PULLDOWN MENU BUTTON (tombol kiri tengah)
• Pilih Tools
• Pilih Message settings
• Pilih E-mail...
• Mailbox name : (nama mailbox Anda)
• Tekan Next
• Name : (nama Anda)
• Username : (username mail Anda)
• Username : (password mail Anda)
• My e-mail address : (email address Anda)
• Tekan Next
• Incoming server (POP3) : (POP3 server mail yg Anda gunakan) contoh : POP3.telkom.net
• Outgoing server (SMTP) : mail.telkomsel.com
• Tekan Finish


Nokia 9300

Konfigurasi Automatic via OTA (Over The Air Activation)

S Nokia 9300, TelkomselGPRS, 1234

Format Dasar OTA untuk handphone TCP/ IP based (ex. 6600, 6230, 7610, dll) :

S

kemudian kirim ke 5432

keterangan:
S = Subscribe
Merk = contoh: Nokia, Siemens
Type = contoh: 3650, 6600
Setting = contoh: TelkomselGPRS(untuk semua setting), Tsel-wap, Tsel-mms, Tsel-csd
PIN = optional, beberapa handphone yg termasuk "tcp/ip mobilephone" membutuhkan kode pin 1234


Konfigurasi Manual WAP over GPRS

Nokia 9300

• Pilih icon Tools
• Pilih control panel
• Pilih connections
• Tekan New
• Tekan Next
• Internet setting name : TSEL WAP
• Network Id : default GPRS Network (Internet)
• Internet settings type : GPRS
• Tekan next
• GPRS access point : internet
• Password prompt : No
• User name : wap
• Password : wap123
• Tekan Next
• Tekan Finish


Konfigurasi Manual MMS over GPRS

Nokia 9300

• Pilih icon Tools
• Pilih control panel
• Pilih connections
• Tekan New
• Tekan Next
• Internet setting name : TSEL MMS
• Network Id : default GPRS Network (Internet)
• Internet settings type : GPRS
• Tekan next
• GPRS access point : internet
• Password prompt : No
• User name : wap
• Password : wap123
• Tekan Next
• Pilih advanced (kanan tengah)
• Pilih Proxies
• Network type : IPv4
• Proxy protocol : HTTP
• Use proxy server : Yes
• Proxy server : 10.1.89.150
• Port number : 8000
• Tekan Done
• Tekan Finish

• Pilih icon Tools
• Pilih control panel
• Pilih messaging
• Pilih multimedia message s...
• Pilih send
• Internet access : TSEL MMS
• Homepage : http://mms.telkomsel.com
• Receive report : Yes
• Sending time : Immediately
• Validity period : maximum
• Tekan done


Konfigurasi Manual E-mail over GPRS

Nokia 9300

• Pilih icon Tools
• Pilih control panel
• Pilih messaging
• Tekan create new
• Pilih e-mail
• Pilih tab general
• Email Account Name : (Nama account Anda)
• My Name : (Nama account Anda)
• Username : (Username Mail Anda)
• Password : (Password Mail Anda)
• My email address : (Alamat Mail Anda)
• Pilih tab servers
• Outgoing e-mail server : mail.telkomsel.com
• Incoming e-mail server : pop3.telkom.net
• Use SMTP authentication : No
• Tekan Done


Nokia 9500

Konfigurasi Automatic via OTA (Over The Air Activation)

S Nokia 9500, TelkomselGPRS, 1234

Format Dasar OTA untuk handphone TCP/ IP based (ex. 6600, 6230, 7610, dll) :

S

kemudian kirim ke 5432

keterangan:
S = Subscribe
Merk = contoh: Nokia, Siemens
Type = contoh: 3650, 6600
Setting = contoh: TelkomselGPRS(untuk semua setting), Tsel-wap, Tsel-mms, Tsel-csd
PIN = optional, beberapa handphone yg termasuk "tcp/ip mobilephone" membutuhkan kode pin 1234


Konfigurasi Automatic menggunakan wizard

Nokia 9500

• Pilih icon Setting Wizard
• Pada Tab Email :
- country : Indonesia
- ISP : (ISP yang Anda gunakan)
- Internet Access Point : TSEL-GPRS
• Pada Tab Advanced :
- country : Indonesia
- Operator : Telkomsel
• Pada Tab Streaming :
- country : Indonesia
- Operator : Telkomsel
• Tekan Exit


Konfigurasi Manual Internet over GPRS

Nokia 9500

• Pilih icon Tools
• Pilih control panel
• Pilih connections
• Tekan New
• Pada tab General
- Internet setting name : TSEL-GPRS
- Network Id : default GPRS Network (Internet)
- Internet settings type : GPRS
• Pada tab connection
- GPRS access point : internet
- Password prompt : No
- User name : wap
- Password : wap123
• Tekan Done


Konfigurasi Manual MMS over GPRS

Nokia 9500

• Pilih icon Tools
• Pilih control panel
• Pilih connections
• Tekan New
• Pada tab General
- Internet setting name : TSEL-MMS
- Network Id : default GPRS Network
- Internet settings type : GPRS
• Pada tab connection
- GPRS access point : mms
- Password prompt : No
- User name : wap
- Password : wap123
• Tekan Done

• Pilih advanced (kanan tengah)
• Pilih Proxies
• Network type : IPv4
• Proxy protocol : HTTP
• Use proxy server : Yes
• Proxy server : 10.1.89.150
• Port number : 8000
• Tekan Done
• Tekan Finish

• Pilih icon Tools
• Pilih control panel
• Pilih messaging
• Pilih multimedia message s...
• Pilih send
• Internet access : TSEL MMS
• Homepage : http://mms.telkomsel.com
• Receive report : Yes
• Sending time : Immediately
• Validity period : maximum
• Tekan done


Konfigurasi Manual E-mail over GPRS

Nokia 9300

• Pilih icon Tools
• Pilih control panel
• Pilih messaging
• Tekan create new
• Pilih e-mail
• Pilih tab general
• Email Account Name : (Nama account Anda)
• My Name : (Nama account Anda)
• Username : (Username Mail Anda)
• Password : (Password Mail Anda)
• My email address : (Alamat Mail Anda)
• Pilih tab servers
• Outgoing e-mail server : mail.telkomsel.com
• Incoming e-mail server : (incoming mail Anda)
• Use SMTP authentication : No
• Tekan Done


Nokia N93

WAP Settings
Go to Menu -> Tools - Settings -> Connection -> Access points
Cllick on Options -> New access point -> Use default settings

Then edit the details:
Connection name : TSEL-DATA
Data bearer : Packet data
Access point name : telkomsel
User name : wap
Prompt password : No
Password : wap123
Authentication : Normal
Homepage : http://wap.telkomsel.com

When you are done, click on Options -> Advanced Settings
Then edit the details:
Network type : IPv4
Phone IP Address : Automatic
DNS Address : Automatic
Proxy serv. Address : 10.1.89.130
Proxy port number : 8000

Go to Menu -> Services -> Options -> Settings
Access point and homepage used should be:
Access point : TSEL-DATA
Homepage : http://wap.telkomsel.com

Then you are ready to browse wap.telkomsel.com by choosing Menu -> Services or Menu --> Web


Streaming Settings
Prior to create following streaming setting then access point has to be created first

Go to Menu -> Applications -> Real Player
Click on Options -> Settings -> Connection ->Proxy
Use proxy : No

Go to Menu -> Applications -> Real Player
Click on Options -> Settings -> Connection ->Network
Default access point : TSEL-GPRS

Now you are ready to stream by choosing Menu -> Services and go to http://wap.telkomsel.com

MMS Settings
Go to Menu -> Tools - Settings -> Connection -> Access points
Cllick on Options -> New access point -> Use default settings

Then edit the details:
Connection name : TSEL-MMS
Data bearer : Packet data
Access point name : mms
User name : wap
Prompt password : No
Password : wap123
Authentication : Normal
Homepage : http://mms.telkomsel.com

When you are done, click on Options -> Advanced Settings
Then edit the details:
Network type : IPv4
Phone IP Address : Automatic
DNS Address : Automatic
Proxy serv. address : 10.1.89.150
Proxy port number : 8000

Go to Menu -> Messag. ->Options -> Settings -> Multimedia Message
Verify that following settings are used:
Access point in use : TSEL-MMS
Multimedia retrieval : Auto. in home network
When the settings are as described above, then you are ready to send and receive MMS.


Nokia N73

WAP Settings
Go to Menu -> Tools - Settings -> Connection -> Access points
Cllick on Options -> New access point -> Use default settings

Then edit the details:
Connection name : TSEL-DATA
Data bearer : Packet data
Access point name : telkomsel
User name : wap
Prompt password : No
Password : wap123
Authentication : Normal
Homepage : http://wap.telkomsel.com

When you are done, click on Options -> Advanced Settings
Then edit the details:
Network type : IPv4
Phone IP Address : Automatic
DNS Address : Automatic
Proxy serv. Address : 10.1.89.130
Proxy port number : 8000

Go to Menu -> Services -> Options -> Settings
Access point and homepage used should be:
Access point : TSEL-DATA
Homepage : http://wap.telkomsel.com

Then you are ready to browse wap.telkomsel.com by choosing Menu -> Services or Menu --> Web

Streaming Settings
Prior to create following streaming setting then access point has to be created first

Go to Menu -> Applications -> Real Player
Click on Options -> Settings -> Connection ->Proxy
Use proxy : No

Go to Menu -> Applications -> Real Player
Click on Options -> Settings -> Connection ->Network
Default access point : TSEL-GPRS

Now you are ready to stream by choosing Menu -> Services and go to http://wap.telkomsel.com

MMS Settings
Go to Menu -> Tools - Settings -> Connection -> Access points
Cllick on Options -> New access point -> Use default settings

Then edit the details:
Connection name : TSEL-MMS
Data bearer : Packet data
Access point name : mms
User name : wap
Prompt password : No
Password : wap123
Authentication : Normal
Homepage : http://mms.telkomsel.com

When you are done, click on Options -> Advanced Settings
Then edit the details:
Network type : IPv4
Phone IP Address : Automatic
DNS Address : Automatic
Proxy serv. address : 10.1.89.150
Proxy port number : 8000

Go to Menu -> Messag. ->Options -> Settings -> Multimedia Message
Verify that following settings are used:
Access point in use : TSEL-MMS
Multimedia retrieval : Auto. in home network
When the settings are as described above, then you are ready to send and receive MMS.


Nokia 6630

WAP Settings
Go to Menu -> Tools - Settings -> Connection -> Access points
Cllick on Options -> New access point -> Use default settings

Then edit the details:
Connection name : TSEL-DATA
Data bearer : Packet data
Access point name : telkomsel
User name : wap
Prompt password : No
Password : wap123
Authentication : Normal
Homepage : http://wap.telkomsel.com

When you are done, click on Options -> Advanced Settings
Then edit the details:
Network type : IPv4
Phone IP Address : Automatic
DNS Address : Automatic
Proxy serv. Address : 10.1.89.130
Proxy port number : 8000

Go to Menu -> Services -> Options -> Settings
Access point and homepage used should be:
Access point : TSEL-DATA
Homepage : http://wap.telkomsel.com

Then you are ready to browse wap.telkomsel.com by choosing Menu -> Services or Menu --> Web

Streaming Settings
Prior to create following streaming setting then access point has to be created first

Go to Menu -> Applications -> Real Player
Click on Options -> Settings -> Connection ->Proxy
Use proxy : No

Go to Menu -> Applications -> Real Player
Click on Options -> Settings -> Connection ->Network
Default access point : TSEL-GPRS

Now you are ready to stream by choosing Menu -> Services and go to http://wap.telkomsel.com

MMS Settings
Go to Menu -> Tools - Settings -> Connection -> Access points
Cllick on Options -> New access point -> Use default settings

Then edit the details:
Connection name : TSEL-MMS
Data bearer : Packet data
Access point name : mms
User name : wap
Prompt password : No
Password : wap123
Authentication : Normal
Homepage : http://mms.telkomsel.com

When you are done, click on Options -> Advanced Settings
Then edit the details:
Network type : IPv4
Phone IP Address : Automatic
DNS Address : Automatic
Proxy serv. address : 10.1.89.150
Proxy port number : 8000

Go to Menu -> Messag. ->Options -> Settings -> Multimedia Message
Verify that following settings are used:
Access point in use : TSEL-MMS
Multimedia retrieval : Auto. in home network
When the settings are as described above, then you are ready to send and receive MMS.


Nokia 6680

WAP Settings
Go to Menu -> Tools - Settings -> Connection -> Access points
Cllick on Options -> New access point -> Use default settings

Then edit the details:
Connection name : TSEL-DATA
Data bearer : Packet data
Access point name : telkomsel
User name : wap
Prompt password : No
Password : wap123
Authentication : Normal
Homepage : http://wap.telkomsel.com

When you are done, click on Options -> Advanced Settings
Then edit the details:
Network type : IPv4
Phone IP Address : Automatic
DNS Address : Automatic
Proxy serv. Address : 10.1.89.130
Proxy port number : 8000

Go to Menu -> Services -> Options -> Settings
Access point and homepage used should be:
Access point : TSEL-DATA
Homepage : http://wap.telkomsel.com

Then you are ready to browse wap.telkomsel.com by choosing Menu -> Services or Menu --> Web

Streaming Settings
Prior to create following streaming setting then access point has to be created first

Go to Menu -> Applications -> Real Player
Click on Options -> Settings -> Connection ->Proxy
Use proxy : No

Go to Menu -> Applications -> Real Player
Click on Options -> Settings -> Connection ->Network
Default access point : TSEL-GPRS

Now you are ready to stream by choosing Menu -> Services and go to http://wap.telkomsel.com

MMS Settings
Go to Menu -> Tools - Settings -> Connection -> Access points
Cllick on Options -> New access point -> Use default settings

Then edit the details:
Connection name : TSEL-MMS
Data bearer : Packet data
Access point name : mms
User name : wap
Prompt password : No
Password : wap123
Authentication : Normal
Homepage : http://mms.telkomsel.com

When you are done, click on Options -> Advanced Settings
Then edit the details:
Network type : IPv4
Phone IP Address : Automatic
DNS Address : Automatic
Proxy serv. address : 10.1.89.150
Proxy port number : 8000

Go to Menu -> Messag. ->Options -> Settings -> Multimedia Message
Verify that following settings are used:
Access point in use : TSEL-MMS
Multimedia retrieval : Auto. in home network
When the settings are as described above, then you are ready to send and receive MMS.


Nokia N71

WAP Settings
Go to Menu -> Tools - Settings -> Connection -> Access points
Cllick on Options -> New access point -> Use default settings

Then edit the details:
Connection name : TSEL-DATA
Data bearer : Packet data
Access point name : telkomsel
User name : wap
Prompt password : No
Password : wap123
Authentication : Normal
Homepage : http://wap.telkomsel.com

When you are done, click on Options -> Advanced Settings
Then edit the details:
Network type : IPv4
Phone IP Address : Automatic
DNS Address : Automatic
Proxy serv. Address : 10.1.89.130
Proxy port number : 8000

Go to Menu -> Services -> Options -> Settings
Access point and homepage used should be:
Access point : TSEL-DATA
Homepage : http://wap.telkomsel.com

Then you are ready to browse wap.telkomsel.com by choosing Menu -> Services or Menu --> Web

Streaming Settings
Prior to create following streaming setting then access point has to be created first

Go to Menu -> Applications -> Real Player
Click on Options -> Settings -> Connection ->Proxy
Use proxy : No

Go to Menu -> Applications -> Real Player
Click on Options -> Settings -> Connection ->Network
Default access point : TSEL-GPRS

Now you are ready to stream by choosing Menu -> Services and go to http://wap.telkomsel.com

MMS Settings
Go to Menu -> Tools - Settings -> Connection -> Access points
Cllick on Options -> New access point -> Use default settings

Then edit the details:
Connection name : TSEL-MMS
Data bearer : Packet data
Access point name : mms
User name : wap
Prompt password : No
Password : wap123
Authentication : Normal
Homepage : http://mms.telkomsel.com

When you are done, click on Options -> Advanced Settings
Then edit the details:
Network type : IPv4
Phone IP Address : Automatic
DNS Address : Automatic
Proxy serv. address : 10.1.89.150
Proxy port number : 8000

Go to Menu -> Messag. ->Options -> Settings -> Multimedia Message
Verify that following settings are used:
Access point in use : TSEL-MMS
Multimedia retrieval : Auto. in home network
When the settings are as described above, then you are ready to send and receive MMS.


Nokia N80

WAP Settings
Go to Menu -> Tools - Settings -> Connection -> Access points
Cllick on Options -> New access point -> Use default settings

Then edit the details:
Connection name : TSEL-DATA
Data bearer : Packet data
Access point name : telkomsel
User name : wap
Prompt password : No
Password : wap123
Authentication : Normal
Homepage : http://wap.telkomsel.com

When you are done, click on Options -> Advanced Settings
Then edit the details:
Network type : IPv4
Phone IP Address : Automatic
DNS Address : Automatic
Proxy serv. Address : 10.1.89.130
Proxy port number : 8000

Go to Menu -> Services -> Options -> Settings
Access point and homepage used should be:
Access point : TSEL-DATA
Homepage : http://wap.telkomsel.com

Then you are ready to browse wap.telkomsel.com by choosing Menu -> Services or Menu --> Web

Streaming Settings
Prior to create following streaming setting then access point has to be created first

Go to Menu -> Applications -> Real Player
Click on Options -> Settings -> Connection ->Proxy
Use proxy : No

Go to Menu -> Applications -> Real Player
Click on Options -> Settings -> Connection ->Network
Default access point : TSEL-GPRS

Now you are ready to stream by choosing Menu -> Services and go to http://wap.telkomsel.com

MMS Settings
Go to Menu -> Tools - Settings -> Connection -> Access points
Cllick on Options -> New access point -> Use default settings

Then edit the details:
Connection name : TSEL-MMS
Data bearer : Packet data
Access point name : mms
User name : wap
Prompt password : No
Password : wap123
Authentication : Normal
Homepage : http://mms.telkomsel.com

When you are done, click on Options -> Advanced Settings
Then edit the details:
Network type : IPv4
Phone IP Address : Automatic
DNS Address : Automatic
Proxy serv. address : 10.1.89.150
Proxy port number : 8000

Go to Menu -> Messag. ->Options -> Settings -> Multimedia Message
Verify that following settings are used:
Access point in use : TSEL-MMS
Multimedia retrieval : Auto. in home network
When the settings are as described above, then you are ready to send and receive MMS.


Sony Ericsson K750i

Konfigurasi Automatic via OTA (Over The Air Activation)

Konfigurasi Automatic via OTA (Over The Air Activation)

Ketik sms dibawah ini :

S sonyericsson K750i

kemudian kirim ke 5432


Konfigurasi Manual K750i


Parameter Umum

• Connection Name : APN Telkomsel
• Data Bearer : GPRS
• Access Point Name : telkomsel
• Username : wap
• Prompt Password : No
• Password : wap123
• Authentication : Normal
• Gateway IP address : 10.1.89.130
• Homepage : http://wap.telkomsel.com
• Connection Security : Off
• Session Mode : Permanent


Sony Ericsson K750i

• Tekan tombol navigasi untuk masuk ke menu utama
• Pilih icon "Setting"
• Pilih tab "Connectivity"
• Pilih menu "Data comm."
• Pilih menu "Data accounts"
• Pilih menu "New account"
• Pada menu Account type pilih menu "GPRS data"
- Name: Telkomsel GPRS
- APN : telkomsel
- User : wap
- Password : wap123
• Tekan tombol save
• Tekan tombol navigasi untuk masuk ke menu utama
• Pilih icon "Connectivity"
• Pilih menu "Internet profile"
• Pilih menu "Internet profiles"
• Pilih menu "New profile"
• Pada menu New profile isi parameter berikut :
- Name : Telkomsel GPRS
- Connect using : Telkomsel GPRS
• Tekan tombol save
• Sorot "Telkomsel GPRS"
• Tekan "More"
• Pilih menu "Advanced"
• Pilih menu "Change homepage"
• Pada menu Change homepage isi parameter berikut :
- Name : Telkomsel GPRS
- Address : http://wap.telkomsel.com
• Tekan tombol "Save"
• Tekan tombol panah satu kali untuk kembali kemenu sebelumnya.
• Sorot "Telkomsel GPRS", lalu tekan tombol "More"
• Pilih menu "Settings"
• Pastikan Connect using menggunakan "Telkomsel GPRS"
• Isi parameter berikut :
- Internet mode : HTTP
- IP Address : 10.1.89.130
- Port Number : 8000
- Username : (kosongkan)
- Password : (kosongkan)
• Tekan "Save"
• Sorot "Telkomsel GPRS", tekan tombol "Select"
• Tekan tombol panah sampai kembali ke standby.
• Tekan tombol navigasi untuk masuk ke menu utama
• Pilih icon "Internet services"
• Pilih tombol "More" Pilih "Telkomsel GPRS" untuk mulai WAP browsing.


Konfigurasi Manual MMS over GPRS


Parameter Umum

• Connection Name : APN MMS
• Data Bearer : GPRS
• Access Point Name : mms
• Username : wap
• Prompt Password : No
• Password : wap123
• Authentication : Normal
• Gateway IP address : 10.1.89.150
• Homepage : http://mms.telkomsel.com
• Connection Security : Off
• Session Mode : Permanent


Sony Ericsson K750i

• Tekan tombol navigasi untuk masuk ke menu utama
• Pilih icon "Setting"
• Pilih tab "Connectivity"
• Pilih menu "Data comm."
• Pilih menu "Data accounts"
• Pilih menu "New account"
• Pada menu Account type pilih menu "GPRS data"
• Pada Name: isi "Telkomsel MMS"
• Pada menu New GPRS data isi parameter berikut :
- APN : mms
- User id : wap
- Password : wap123
• Tekan tombol save
• Tekan tombol navigasi untuk masuk ke menu utama
• Pilih icon "Connectivity"
• Pilih menu "Internet settings"
• Pilih menu "Internet profiles"
• Pilih menu "New profile"
• Pada menu New profile isi parameter berikut :
- Name : Telkomsel MMS
- Connect using : pilih Telkomsel MMS
• Tekan tombol save
• Sorot "Telkomsel MMS"
• Tekan "More"
• Pilih menu "Settings"
• Pastikan Connect using menggunakan "Telkomsel MMS"
vIsi parameter berikut :
- Internet mode : HTTP
- Use proxy : YES
- IP Address : 10.1.89.150
- Port number : 8000
- Username : (kosongkan)
- Password : (kosongkan)
• Tekan "Save"
• Sorot "Telkomsel MMS", tekan tombol "Select"
• Tekan tombol panah sampai kembali ke standby.
• Tekan tombol navigasi untuk masuk ke menu utama
• Pilih icon "Messaging"
• Pilih menu "Setting"
• Pilih menu "Picture msg"
• Isi / pilih parameter berikut :
- Name : Telkomsel MMS
- Connect using : Telkomsel MMS
- Delivery report : On
- Message server : http://mms.telkomsel.com/
- Internet Profile, pilih "Telkomsel MMS", tekan tombol Select.
- Tekan tombol panah 2 kali untuk kembali ke menu "Messaging".
• Konfigurasi MMS telah selesai dilakukan.


Sony Ericsson W800i

Konfigurasi Automatic via OTA (Over The Air Activation)

Ketik sms dibawah ini :

S sony ericsson W800i

kemudian kirim ke 5432

Konfigurasi Manual W800/W800i


Konfigurasi Manual W800/W800i


Parameter Umum

• Connection Name : APN Telkomsel
• Data Bearer : GPRS
• Access Point Name : telkomsel
• Username : wap
• Prompt Password : No
• Password : wap123
• Authentication : Normal
• Gateway IP address : 10.1.89.130
• Homepage : http://wap.telkomsel.com
• Connection Security : Off
• Session Mode : Permanent


Sony Ericsson W800

• Tekan tombol navigasi untuk masuk ke menu utama
• Pilih icon "Setting"
• Pilih tab "Connectivity"
• Pilih menu "Data comm."
• Pilih menu "Data accounts"
• Pilih menu "New account"
• Pada menu Account type pilih menu "GPRS data"
- Name: Telkomsel GPRS
- APN : telkomsel
- User : wap
- Password : wap123
• Tekan tombol save
• Tekan tombol navigasi untuk masuk ke menu utama
• Pilih icon "Connectivity"
• Pilih menu "Internet profile"
• Pilih menu "Internet profiles"
• Pilih menu "New profile"
• Pada menu New profile isi parameter berikut :
- Name : Telkomsel GPRS
- Connect using : Telkomsel GPRS
• Tekan tombol save
• Sorot "Telkomsel GPRS"
• Tekan "More"
• Pilih menu "Advanced"
• Pilih menu "Change homepage"
• Pada menu Change homepage isi parameter berikut : - Name : Telkomsel GPRS - Address : http://wap.telkomsel.com • Tekan tombol "Save" • Tekan tombol panah satu kali untuk kembali kemenu sebelumnya. • Sorot "Telkomsel GPRS", lalu tekan tombol "More" • Pilih menu "Settings" • Pastikan Connect using menggunakan "Telkomsel GPRS" • Isi parameter berikut : - Internet mode : HTTP - IP Address : 10.1.89.130 - Port Number : 8000 - Username : (kosongkan) - Password : (kosongkan) • Tekan "Save" • Sorot "Telkomsel GPRS", tekan tombol "Select" • Tekan tombol panah sampai kembali ke standby. • Tekan tombol navigasi untuk masuk ke menu utama • Pilih icon "Internet services" • Pilih tombol "More" Pilih "Telkomsel GPRS" untuk mulai WAP browsing.


Konfigurasi Manual MMS over GPRS


Parameter Umum

• Connection Name : APN MMS
• Data Bearer : GPRS
• Access Point Name : mms
• Username : wap
• Prompt Password : No
• Password : wap123
• Authentication : Normal
• Gateway IP address : 10.1.89.150
• Homepage : http://mms.telkomsel.com
• Connection Security : Off
• Session Mode : Permanent


Sony Ericsson W800

• Tekan tombol navigasi untuk masuk ke menu utama
• Pilih icon "Setting"
• Pilih tab "Connectivity"
• Pilih menu "Data comm."
• Pilih menu "Data accounts"
• Pilih menu "New account"
• Pada menu Account type pilih menu "GPRS data"
• Pada Name: isi "Telkomsel MMS"
• Pada menu New GPRS data isi parameter berikut :
- APN : mms
- User id : wap
- Password : wap123
• Tekan tombol save
• Tekan tombol navigasi untuk masuk ke menu utama
• Pilih icon "Connectivity"
• Pilih menu "Internet settings"
• Pilih menu "Internet profiles"
• Pilih menu "New profile"
• Pada menu New profile isi parameter berikut :
- Name : Telkomsel MMS
- Connect using : pilih Telkomsel MMS
• Tekan tombol save
• Sorot "Telkomsel MMS"
• Tekan "More"
• Pilih menu "Settings"
• Pastikan Connect using menggunakan "Telkomsel MMS"
• Isi parameter berikut :
- Internet mode : HTTP
- Use proxy : YES
- IP Address : 10.1.89.150
- Port number : 8000
- Username : (kosongkan)
- Password : (kosongkan)
• Tekan "Save"
• Sorot "Telkomsel MMS", tekan tombol "Select"
• Tekan tombol panah sampai kembali ke standby.
• Tekan tombol navigasi untuk masuk ke menu utama
• Pilih icon "Messaging"
• Pilih menu "Setting"
• Pilih menu "Picture msg"
• Isi / pilih parameter berikut :
- Name : Telkomsel MMS
- Connect using : Telkomsel MMS
- Delivery report : On
- Message server : http://mms.telkomsel.com/
- Internet Profile, pilih "Telkomsel MMS", tekan tombol Select.
- Tekan tombol panah 2 kali untuk kembali ke menu "Messaging".
• Konfigurasi MMS telah selesai dilakukan.


Sony Ericsson S700i


Konfigurasi Automatic via OTA (Over The Air Activation)

Ketik sms dibawah ini :

S sony ericsson S700i

kemudian kirim ke 5432


Konfigurasi Manual WAP over GPRS


Parameter Umum

• Connection Name : APN Telkomsel
• Data Bearer : GPRS
• Access Point Name : telkomsel
• Username : wap
• Prompt Password : No
• Password : wap123
• Authentication : Normal
• Gateway IP address : 10.1.89.130
• Homepage : http://wap.telkomsel.com
• Connection Security : Off
• Session Mode : Permanent


Sony Ericsson S700i

• Tekan tombol navigasi untuk masuk ke menu utama
• Pilih icon "Connectivity"
• Pilih menu "Data comm."
• Pilih menu "Data accounts"
• Pilih menu "New account"
• Pada menu Account type pilih menu "GPRS data"
• Pada Name: isi "GPRS WAP"
• Pada menu New GPRS data isi parameter berikut :
- APN : telkomsel
- User id : wap
- Password : wap123
• Tekan tombol save
• Tekan tombol navigasi untuk masuk ke menu utama
• Pilih icon "Connectivity"
• Pilih menu "Internet settings"
• Pilih menu "Internet profiles"
• Pilih menu "New profile"
• Pada menu New profile isi parameter berikut :
- Name : GPRS WAP
- Connect using : pilih GPRS WAP
• Tekan tombol save
• Sorot "GPRS WAP"
• Tekan "More"
• Pilih menu "Advanced"
• Pilih menu "Change homepage"
• Pada menu Change homepage isi parameter berikut :
- Name : GPRS WAP
- WWW Address : hapus [Internal address] ganti dengan "http://wap.telkomsel.com"
• Tekan tombol "Save"
• Tekan tombol panah satu kali untuk kembali kemenu sebelumnya.
• Sorot "GPRS WAP", lalu tekan tombol "More"
• Pilih menu "Settings"
• Pastikan Connect using menggunakan "GPRS WAP"
• Isi parameter berikut :
- Internet mode : WAP
- IP Address : 10.1.89.130
- Security : Off
- Username : (kosongkan)
- Password : (kosongkan)
• Tekan "Save"
• Sorot "GPRS WAP", tekan tombol "Select"
• Tekan tombol panah sampai kembali ke standby.
• Tekan tombol navigasi untuk masuk ke menu utama
• Pilih icon "Internet services"
• Pilih tombol "More" Pilih "GPRS WAP" untuk mulai WAP browsing.


Konfigurasi Manual MMS over GPRS


Parameter Umum

• Connection Name : APN MMS
• Data Bearer : GPRS
• Access Point Name : mms
• Username : wap
• Prompt Password : No
• Password : wap123
• Authentication : Normal
• Gateway IP address : 10.1.89.150
• Homepage : http://mms.telkomsel.com
• Connection Security : Off
• Session Mode : Permanent


Sony Ericsson S700i

• Tekan tombol navigasi untuk masuk ke menu utama
• Pilih icon "Connectivity"
• Pilih menu "Data comm."
• Pilih menu "Data accounts"
• Pilih menu "New account"
• Pada menu Account type pilih menu "GPRS data"
• Pada Name: isi "GPRS MMS"
• Pada menu New GPRS data isi parameter berikut :
- APN : mms
- User id : wap
- Password : wap123
• Tekan tombol save
• Tekan tombol navigasi untuk masuk ke menu utama
• Pilih icon "Connectivity"
• Pilih menu "Internet settings"
• Pilih menu "Internet profiles"
• Pilih menu "New profile"
• Pada menu New profile isi parameter berikut :
- Name : GPRS MMS
- Connect using : pilih GPRS MMS
• Tekan tombol save
• Sorot "GPRS MMS"
• Tekan "More"
• Pilih menu "Settings"
• Pastikan Connect using menggunakan "GPRS MMS"
• Isi parameter berikut :
- Internet mode : WAP
- IP Address : 10.1.89.150
- Security : Off
- Username : (kosongkan)
- Password : (kosongkan)
• Tekan "Save"
• Sorot "GPRS MMS", tekan tombol "Select"
• Tekan tombol panah sampai kembali ke standby.
• Tekan tombol navigasi untuk masuk ke menu utama
• Pilih icon "Messaging"
• Pilih menu "Setting"
• Pilih menu "Picture msg"
• Pilih menu "Options"
• Isi / pilih parameter Options berikut :
- Validity period : Maximum
- Read report : Off
- Delivery report : On
- Restrict message :
- Content alert : On
- Message server : http://mms.telkomsel.com/
- Internet Profile, pilih "GPRS MMS", tekan tombol Select.
- Tekan tombol panah 2 kali untuk kembali ke menu "Messaging".
• Konfigurasi MMS telah selesai dilakukan.


Sony Ericsson Z600

Konfigurasi Manual WAP over GPRS

Parameter Umum

• Connection Name : APN Telkomsel
• Data Bearer : GPRS
• Access Point Name : telkomsel
• Username : wap
• Prompt Password : No
• Password : wap123
• Authentication : Normal
• Gateway IP address : 10.1.89.130
• Homepage : http://wap.telkomsel.com
• Connection Security : Off
• Session Mode : Permanent


Sony Ericsson Z600

• Tekan tombol navigasi untuk masuk ke menu utama
• Pilih icon "Connectivity"
• Pilih menu "Data comm."
• Pilih menu "Data accounts"
• Pilih menu "New account"
• Pada menu Account type pilih menu "GPRS data"
• Pada Name: isi "GPRS WAP"
• Pada menu New GPRS data isi parameter berikut :
- APN : telkomsel
- User id : wap
- Password : wap123
• Tekan tombol save
• Tekan tombol navigasi untuk masuk ke menu utama
• Pilih icon "Connectivity"
• Pilih menu "WAP options"
• Pilih menu "WAP profiles"
• Pilih menu "New profile"
• Pada menu New profile isi parameter berikut :
- Name : GPRS WAP
- Connect using : pilih GPRS WAP
- IP address : 10.1.89.130
• Tekan tombol save
• Pilih "GPRS WAP", tekan "Select", lalu tekan "Edit"
• Pilih menu "Advanced"
• Pilih menu "Change homepage"
• Pada menu Change homepage isi parameter berikut :
- Name : GPRS WAP
- WWW Address : hapus [Internal address] ganti dengan "http://wap.telkomsel.com"
- Tekan tombol panah sampai kembali ke standby.
- Tekan tombol navigasi untuk masuk ke menu utama
- Pilih icon "Internet services"
• Pilih tombol "More"
• Pilih "GPRS WAP" untuk mulai WAP browsing.


Konfigurasi Manual MMS over GPRS


Parameter Umum

• Connection Name : APN MMS
• Data Bearer : GPRS
• Access Point Name : mms
• Username : wap
• Prompt Password : No
• Password : wap123
• Authentication : Normal
• Gateway IP address : 10.1.89.150
• Homepage : http://mms.telkomsel.com
• Connection Security : Off
• Session Mode : Permanent


Sony Ericsson Z600

• Tekan tombol navigasi untuk masuk ke menu utama
• Pilih icon "Connectivity"
• Pilih menu "Data comm."
• Pilih menu "Data accounts"
• Pilih menu "New account"
• Pada menu Account type pilih menu "GPRS data"
• Pada Name: isi "GPRS MMS"
• Pada menu New GPRS data isi parameter berikut :
- APN : mms
- User id : wap
- Password : wap123
• Tekan tombol save
• Tekan tombol navigasi untuk masuk ke menu utama
• Pilih icon "Connectivity"
• Pilih menu "WAP options"
• Pilih menu "WAP profiles"
• Pilih menu "New profile"
• Pada menu New Profile isi parameter berikut :
- Name : GPRS MMS
- Connect using : pilih GPRS MMS
- IP address : 10.1.89.150
• Tekan tombol save F
• Tekan tombol panah sampai kembali ke stand by.
• Tekan tombol navigasi untuk masuk ke menu utama
• Pilih icon "Messaging"
• Pilih menu "Picture"
• Pilih menu "Options"
• Isi / pilih parameter Options berikut :
- Validity period : Maximum
- Read report : Off
- Delivery report : On
- Restrict message :
- Content alert : On
- Message server : http://mms.telkomsel.com/
- WAP Profile, pilih menu "Select", pilih "GPRS MMS".


Sony Ericsson P910


Konfigurasi Automatic via OTA (Over The Air Activation)

Ketik sms dibawah ini :

S sony ericsson P910i

kemudian kirim ke 5432


Konfigurasi Manual WAP over GPRS


Sony Ericsson P910

• Klik icon "Application" (bergambar empat bulatan kecil).
• Pilih menu "Control panel"
• Dari tab "Connections" pilih menu "Internet accounts"
• Tekan tombol "New"
• Masukkan "GPRS WAP" di "Account name:"
• Pilih "GPRS" di menu pull down "Connection type:"
• Tekan tombol "Advanced"
• Beri tanda centang pada "User name dan password required", isi parameter berikut :
- User name : wap
- Password : wap123
- Address : telkomsel
• Pilih tab "Log in", beri tanda centang pada "Get IP address automatically" dan "Get DNS address automatically"
• Pilih tab "Proxy", pastikan "Use proxy server" tidak diberi tanda centang.
• Pilih tab "Other", beri tanda centang pada "Enable PPP extensions", dan pilih menu "Normal" pada menu "Authentication."
• Tekan tombol "Done"
• Pilih "GPRS WAP" di menu pull down "Preffered"
• Tekan tombol "Done"
• Pilih "WAP accounts"
• Tekan tombol "New", isi parameter berikut :
- Account name : GPRS WAP
- Internet account : pilih "GPRS WAP" yang sudah dibuat tadi.
- Beri tanda centang pada Use Proxy
- Address : 10.1.89.130
- Port : 9201
- Username : (kosongkan)
- Password : (kosongkan)
• Tekan tombol "Done"
• Pilih tab "Preffered", beri tanda centang pada "Use WAP account" dan pilih "GPRS WAP" pada menu pull down "Preffered"
• Tekan tombol "Done"
• Klik icon "Internet" dari menu kanan atas.
• Tekan menu "Internet" dari menu kiri atas, lalu pilih "Bookmarks"
• Tekan menu "Internet" dari menu kiri atas, lalu pilih "New bookmark", isi parameter berikut :
- Location : http://wap.telkomsel.com
- Name : WAP Telkomsel
- Folder : Boormarks
- WAP account : GPRS WAP


Konfigurasi Manual MMS over GPRS


Sony Ericsson P910

• Klik icon "Application" (bergambar empat bulatan kecil)
• Pilih menu "Control panel"
• Dari tab "Connections" pilih menu "Internet accounts"
• Tekan tombol "New"
• Masukkan "GPRS MMS" di "Account name:"
• Pilih "GPRS" di menu pull down "Connection type:"
• Tekan tombol "Advanced"
• Beri tanda centang pada "User name dan password required", isi parameter berikut :
- User name : wap
- Password : wap123
- Address : mms
• Pilih tab "Log in", beri tanda centang pada "Get IP address automatically" dan "Get DNS address automatically"
• Pilih tab "Proxy", pastikan "Use proxy server" tidak diberi tanda centang.
• Pilih tab "Other", beri tanda centang pada "Enable PPP extensions", dan pilih menu "Normal" pada menu "Authentication."
• Tekan tombol "Done"
• Pilih "GPRS WAP" di menu pull down "Preffered"
• Tekan tombol C, utk kembali ke menu utama.
• Tekan tombol "Done"
• Pilih "WAP accounts"
• Tekan tombol "New", isi parameter berikut :
- Account name : GPRS MMS
- Internet account : pilih "GPRS MMS" yang sudah dibuat tadi.
- Beri tanda centang pada Use Proxy
- Address : 10.1.89.150
- Port : 9201
- Username : (kosongkan)
- Password : (kosongkan)
• Tekan tombol "Done"
• Pilih "Messaging accounts"
• Pilih tab "MMS", isi parameter berikut :
- Service centre address: http://mms.telkomsel.com/
- WAP account : GPRS MMS
- Automatic : On
- Download size : No restrictions
• Tekan tombol "Advanced", di tab "Send", isi parameter berikut :
- Validity period : Maximum
- Prioriy : Normal
• Beri tanda centang pada menu "Delivery report", option lain biarkan kosong.
• Tekan tab "Receive", isi parameter berikut :
- Beri tanda centang pada bagian "Allow delivery notification" dan "Allow read notification".
- Option lain biarkan kosong.
• Tekan tombol "Done"


Sony Ericsson P900


Konfigurasi Manual WAP over GPRS

Sony Ericsson P900

• Klik icon "Application" (bergambar empat bulatan kecil).
• Pilih menu "Control panel"
• Dari tab "Connections" pilih menu "Internet accounts"
• Tekan tombol "New"
• Masukkan "GPRS WAP" di "Account name:"
• Pilih "GPRS" di menu pull down "Connection type:"
• Tekan tombol "Advanced"
• Beri tanda centang pada "User name dan password required", isi parameter berikut :
- User name : wap
- Password : wap123
- Address : telkomsel
• Pilih tab "Log in", beri tanda centang pada "Get IP address automatically" dan "Get DNS address automatically"
• Pilih tab "Proxy", pastikan "Use proxy server" tidak diberi tanda centang.
• Pilih tab "Other", beri tanda centang pada "Enable PPP extensions", dan pilih menu "Normal" pada menu "Authentication."
• Tekan tombol "Done"
• Pilih "GPRS WAP" di menu pull down "Preffered"
• Tekan tombol "Done"
• Pilih "WAP accounts"
• Tekan tombol "New", isi parameter berikut :
- Account name : GPRS WAP
- Internet account : pilih "GPRS WAP" yang sudah dibuat tadi.
- Beri tanda centang pada Use Proxy
- Address : 10.1.89.130
- Port : 9201
- Username : (kosongkan)
- Password : (kosongkan)
• Tekan tombol "Done"
• Pilih tab "Preffered", beri tanda centang pada "Use WAP account" dan pilih "GPRS WAP" pada menu pull down "Preffered"
• Tekan tombol "Done"
• Klik icon "Internet" dari menu kanan atas.
• Tekan menu "Internet" dari menu kiri atas, lalu pilih "Bookmarks"
• Tekan menu "Internet" dari menu kiri atas, lalu pilih "New bookmark", isi parameter berikut :
- Location : http://wap.telkomsel.com
- Name : WAP Telkomsel
- Folder : Boormarks
- WAP account : GPRS WAP


Konfigurasi Manual MMS over GPRS


Sony Ericsson P900

• Klik icon "Application" (bergambar empat bulatan kecil)
• Pilih menu "Control panel"
• Dari tab "Connections" pilih menu "Internet accounts"
• Tekan tombol "New"
• Masukkan "GPRS MMS" di "Account name:"
• Pilih "GPRS" di menu pull down "Connection type:"
• Tekan tombol "Advanced"
• Beri tanda centang pada "User name dan password required", isi parameter berikut :
- User name : wap
- Password : wap123
- Address : mms
• Pilih tab "Log in", beri tanda centang pada "Get IP address automatically" dan "Get DNS address automatically"
• Pilih tab "Proxy", pastikan "Use proxy server" tidak diberi tanda centang.
• Pilih tab "Other", beri tanda centang pada "Enable PPP extensions", dan pilih menu "Normal" pada menu "Authentication."
• Tekan tombol "Done"
• Pilih "GPRS WAP" di menu pull down "Preffered"
• Tekan tombol C, utk kembali ke menu utama.
• Tekan tombol "Done"
• Pilih "WAP accounts"
• Tekan tombol "New", isi parameter berikut :
- Account name : GPRS MMS
- Internet account : pilih "GPRS MMS" yang sudah dibuat tadi.
- Beri tanda centang pada Use Proxy
- Address : 10.1.89.150
- Port : 9201
- Username : (kosongkan)
- Password : (kosongkan)
• Tekan tombol "Done"
• Pilih "Messaging accounts"
• Pilih tab "MMS", isi parameter berikut :
- Service centre address: http://mms.telkomsel.com/
- WAP account : GPRS MMS
- Automatic : On
- Download size : No restrictions
• Tekan tombol "Advanced", di tab "Send", isi parameter berikut :
- Validity period : Maximum
- Prioriy : Normal
• Beri tanda centang pada menu "Delivery report", option lain biarkan kosong.
• Tekan tab "Receive", isi parameter berikut :
- Beri tanda centang pada bagian "Allow delivery notification" dan "Allow read notification".
- Option lain biarkan kosong.
• Tekan tombol "Done"

CARA MEMBUAT ID ATAU NICKNAME BARU CAMFROG

Untuk Pertama Kali...

CLIK lah ICON Camfrog Yang Ada Di DESKTOP ( Camfrog Video Chat 5.1 )


Setelah Keluar KOLOM UNTUK REGISTER / Membuat ID / Nickname Baru, makan Buat lah -
ID Atau Nickname Baru

Contoh : Abcde
abdd_1234

Atau Nama Yang Bervariasi....

Setelah itu isi lah PASSWORD

Password Terdiri Dari 4 Sampai 19 Digit...
Dan Password boleh di gabung

Misal Nya : abcd123456 / a!@#()$*&%^()$ / a1b2c3#&$^*($

Terserah Kalian....Asal Password Bisa Kalian Ingat Dan Tidak Lupa...

Kemudian Isi lah Email nya....Email Harus Benar Dan Tidak Sembarangan...

Karena, Jika Email Nya Sembarang Atau Salah...Maka Pada Sa'at Kita Lupa Password,
kita tidak bisa meminta atau REQUEST Paswword ke www.camfrog.com.
Jadi Email Harus lah di isi dengan Benar...


Setelah itu...isi lah tanggal lahir ...bulan dan tahun... tidak masalah jika-
di isi sembarangan...


Setalah semua selesai, cLICK lah SUTMIT


Lihat Di Bagian Paling Atas... Ada 2 Pilihan > MALE & FEMALE < Tinggal Kalian CONTANG ... Setelah Itu LOCATION Atau LOKASI Bisa Di Isi ...Misal Nya : Batam / indonesia / atau apa kek.... Kemudian MARIAL STATUS Atau STATUS Diri Kita Single = sendiri Maried = sudah kawin Divorced = sudah cerai In A Relationship = Pribadi atau tidak di ketahui Setelah itu You Are Seeking Atau apa Yang Mau Kita Lihat Misal nya : Male atau pria : Female atau Wanita : Any one atau siapa saja : friends atau Teman : Nobody Atau Tidak Ada Setalah itu CLICK SUBMIT... First Name Dan Selanjut nya tidak perlu di isi........ Kemudian Tunggu Sejenak... Apabila Muncul Tulisan " Registration Was Succesful " Berrati Registrasi- Kita Berhasil....CLICK lah " OK " Kita Tinggl Login ....CLICK LAH " SING ON " Setelah LOGIN BERHASIL.....DI Bagian Paling Bawah Ada 5 Pilihan IM ROOM LIST ADD JOIN CHAT DIRECTORY Nah...Untuk Bergabunf di dalam Room...CLICK Lah " ROOM LIST " Setelah Keluar Kolom Pilihan Room... Perhatikan !!! TULISAN SEBLAH KIRI > VIDEO CHAT ROOMS <
2 ROOM AVAILABLE
FAMILY FILTER IS ON


CLICK lah Tulisan " ON " Yang Berwarna Biru Itu

maka Akan Keluar Kolom " FAMILY FILTER WARNING "


Di Bawah Keterangan Itu Ada 3 Pilihan

1. Termas Of Service
2. Turn Off Family Filter
3. Kepp Family Filter On And Return To The Video Chat Room List


Nah Kalian Tinggal CLICK " TURN OFF FAMILY FILTER "


Maka...List - List Room Akan Menjadi AKTIF semua....Dan Juga Kita Bisa Gabung Di-
Room 18+ Tahun Ke Atas....


Tinggal CLICK " 18+ " Dan CLICK OK

Setelah Itu Kalian Tinggal Pilih Nama-Nama Room Nya...
Sesuai Dengan Keinginan Kalian...

Dan KIta Bisa LIhat Nama-Nama Room Nya....

Kalau Mau Ke Room INDONESIA....Tinggal Kalian Cari Saja Nama Room Yang-
ada Tulisan INDONESIA Nya Atau Nama Room Yang BERTULIS Kan BAHASA INDONESIA

CONTOH NYA : Xx_Indonesia__Show__Time_xX

Setelah Itu CLICK LAH TULISAN ROOM YANG BERWARNA BIRU ITU...Atau Bisa Juga CLICK-
( JOIN )


Setelah Itu Biasa nya sebelum ROOM terbuka....ada tulisa pilihan " YES / NO "

CLICK YES untuk masuk ke dalam room...dan NO untuk ke luar room


Setelah room terbuka dan kita mausk ke dalam room...


di bagian bawah kolom room itu ada 2 pilihan

1. Emoticons
2. Font

Emoticons Untuk icon atau gambar....

Font untuk mengganti warna tulisan dan karajter tulisan....


setelah itu kalian bisa berchatting ria dan mencari temen sebaik dan sebanyak2 nya...


Ingat Satu Hal...ini hanya sebuah GAME...
Jangan Sampai Kalian Terpuruk Di Dalam Nya....


Enjoy Dan Selamat Berchatting Ria !!!